If you own a Honda lawnmower with the innovative Roto Stop feature, you understand the convenience it brings to your yard work.
However, as with any mechanical system, issues can arise.
In this post, we’ll explore common problems associated with Honda’s Roto Stop and provide in-depth troubleshooting and solutions to ensure your lawnmower remains in optimal condition.
Let’s jump in.
Honda Roto Stop Problems
1. Roto Stop Not Engaging
One of the most prevalent issues Honda lawnmower owners encounter is the Roto Stop not engaging when it should.
Let’s delve into the possible causes and their respective solutions in detail.
Cause 1: Faulty Cable
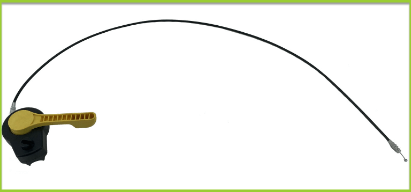
A frequently encountered culprit for Roto Stop malfunctions is a faulty cable. Over time, the cable may develop kinks, fray, or even disconnect in severe cases. This can hinder the smooth engagement of the roto-stop feature.
Solution 1: Cable Replacement
If you detect issues with the cable, it’s advisable to replace it with a new one. Fortunately, Honda makes replacement parts readily available for purchase.

Replacing the cable is typically a straightforward DIY task, ensuring your Roto Stop functions optimally.
Read Honda GX160 No Spark(5 Quick Ways To Fix)
Cause 2: Worn Clutch
Another potential cause of roto-stop failure is a worn-out clutch mechanism. Continuous use can gradually wear down this critical component, making it challenging for the Roto Stop to engage effectively.
Solution 2: Clutch Adjustment
In some cases, adjusting the clutch tension can resolve the problem. Refer to your lawnmower’s user manual for detailed instructions on this adjustment.
However, if adjusting the clutch doesn’t yield positive results, you may need to consider replacing the clutch assembly for improved functionality.
Cause 3: Tension and Spring Issues
Tension springs play a pivotal role in the rotor stop’s proper functioning. If these springs lose their elasticity due to wear and tear, it can affect the engagement of the roto-stop feature.
Solution 3: Spring Maintenance
To address this issue, start by inspecting the tension springs carefully. If they appear worn or lack tension, it’s advisable to replace them promptly.
Well-maintained tension springs ensure that the Roto Stop engages smoothly, allowing you to maintain control over your lawnmower during operation.
Read Honda GCV160 Won’t Stay Running(5 Quick Ways To Fix)
2. Roto Stop Sticking
Another common issue that Honda lawnmower owners may encounter is the Roto Stop mechanism sticking during operation.
This can be frustrating, but understanding the underlying causes and solutions can help you address this problem effectively.
Cause 1: Grass Buildup
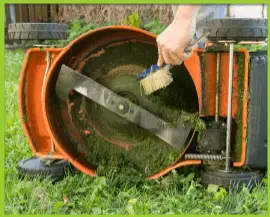
One of the primary reasons for the Roto Stop mechanism sticking is the accumulation of grass clippings and debris.
Over time, these materials can hinder the smooth movement of the roto stop, leading to operational issues.
Read Honda Harmony 1011 Problems(With Solutions)
Solution 1: Cleaning the Mechanism
To mitigate this issue, it’s crucial to regularly clean the Roto Stop area. Remove any accumulated grass clippings, dirt, and debris that may obstruct the mechanism’s functioning.

By keeping this area clean, you ensure that the Roto Stop operates smoothly during your mowing tasks.
Cause 2: Rust and Corrosion
Exposure to moisture, especially if the lawnmower is stored outdoors, can lead to rust and corrosion in various components, including those associated with the Roto Stop mechanism.
Rust and corrosion can hinder the free movement of parts, causing the mechanism to stick.
Solution 2: Rust Removal
If you notice rust on the Roto Stop components, it’s essential to address it promptly. You can use a rust remover and a wire brush to clean off the rust.
Once the rust is removed, apply a suitable rust-resistant coating to prevent future corrosion. This process not only resolves the sticking issue but also prolongs the lifespan of your lawnmower.
Cause 3: Lubrication Problems
Inadequate or improper lubrication can also contribute to the Roto Stop Sticking. Without proper lubrication, friction can occur within the mechanism, impeding its smooth operation.
Solution 3: Proper Lubrication
To prevent lubrication-related issues, it’s crucial to follow the manufacturer’s recommendations regarding the type and frequency of lubrication for the Roto Stop mechanism.
Using the recommended lubricant and applying it correctly ensures that the mechanism operates effortlessly.
Read Low Oil Symptoms in Lawn Mowers (Don’t Ignore These Signs)
Final Remarks
Honda’s Roto Stop feature is a valuable addition to your lawnmower, enhancing safety and convenience during yard work.
While encountering problems with this feature can be frustrating, understanding the causes and implementing the appropriate solutions can keep your lawnmower running smoothly for years to come.
For help reach to Honda support
Read Why Does My Cub Cadet Keep Dying?(7 Reasons + Solutions)
FAQs
Can I repair a Roto Stop cable myself?
Yes, you can typically replace a Roto Stop cable yourself, as it is considered a manageable DIY task. Honda provides replacement parts for your convenience, and the process is outlined in the user manual.
How often should I lubricate the Roto Stop mechanism?
It’s recommended to lubricate the Roto Stop mechanism according to the manufacturer’s guidelines, typically before the start of each mowing season. Regular lubrication helps maintain optimal functionality.
Is rust a common issue with Roto-Stop mechanisms?
Rust can develop on Roto Stop components, especially if the lawnmower is exposed to moisture or stored outdoors. However, regular maintenance, including rust removal and rust-resistant coating application, can prevent this issue.
Can I use any lubricant for the Roto Stop mechanism?
No, it’s essential to use the lubricant specified in your lawnmower’s user manual to ensure compatibility and prevent damage to the mechanism.
Should I seek professional help if the Roto Stop continues to malfunction?
If troubleshooting and the recommended solutions don’t resolve the issue, it’s advisable to consult a Honda-authorized technician for a thorough inspection and potential repair.
Professional assistance ensures that any underlying problems are addressed correctly, restoring your lawnmower’s functionality.


