Keeping your Craftsman weed trimmer in top working condition is important for maintaining your lawn. One of the key maintenance tasks is removing the trimmer head, whether for replacement, repair, or cleaning.
In this post, we’ll walk you through the process step by step to make it simple and straightforward.
How to Remove the Head from a Craftsman Weed Trimmer
Tools You’ll Need
- Flathead screwdriver
- Needle-nose pliers (optional)
- A pair of gloves (for safety)
- Replacement head (if you’re replacing the old one)
Once you have everything in place, let’s get started.
Step 1: Safety First – Disconnect the Power
Safety is always the first step. Whether your Craftsman weed trimmer is gas-powered or electric, you need to make sure the power is disconnected.
- Gas-Powered Trimmers: Turn off the engine completely. If you’ve been using the trimmer, give it a few minutes to cool down to avoid any burns.
- Electric Trimmers: Unplug the trimmer from the power source. If you’re using a battery-powered model, remove the battery pack. This eliminates any risk of the trimmer accidentally turning on while you’re working.
Step 2: Position the Trimmer for Easy Access
Place the trimmer on a flat, stable surface. It’s easier to work on the trimmer when it’s stable, and you won’t have to fight with it while trying to remove the head.
You might find it helpful to prop up the trimmer shaft on a table or bench, letting the cutting head dangle off the edge for easier access.
Read My Craftsman Trimmer Won’t Start(5 Quick Ways To Fix)
Step 3: Remove the Spool Cap or Bump Knob
Most Craftsman weed trimmers use a bump-feed mechanism, where the head feeds more line when you tap it on the ground. To remove the head, you’ll need to take off the bump knob or spool cap, which holds the spool of the trimmer line in place.

- Find the Spool Cap: The spool cap or bump knob is usually located at the center of the cutting head. It may be screwed in or simply snapped into place.
- Remove the Cap: In most cases, you can unscrew the cap by twisting it counterclockwise. If it’s tight, you may need to use a flathead screwdriver to gently pry it loose.
- Some Craftsman models have a locking tab that needs to be pressed while turning the knob, so check if your model has one before using force.
Set the cap aside, as you’ll need it when reassembling the trimmer later.
Step 4: Remove the Spool of Line
Once the bump knob or cap is off, you’ll see the spool of trimmer line inside. Carefully lift the spool out. If you plan to reuse the spool, check the line for any damage or tangles.
If you’re replacing the head completely, this spool and the rest of the old head will be discarded.
Read What Size Battery Does a Craftsman Riding Lawn Mower Take(Recommended)
Step 5: Lock the Shaft (If Necessary)
In some Craftsman models, you’ll need to lock the trimmer shaft to prevent it from rotating while you unscrew the head.
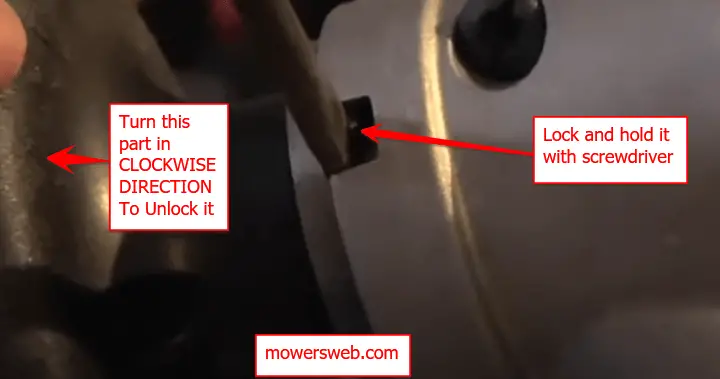
- Look for a Hole or Slot: Near the base of the head, there’s usually a small hole where you can insert a screwdriver or a locking pin to keep the shaft from moving. This allows you to turn the head without the entire shaft rotating.
- Insert a Screwdriver or Pin: Place the screwdriver or locking pin into the hole. This will hold the shaft in place as you remove the cutting head.
Step 6: Unscrew the Cutting Head
With the shaft locked, you can now remove the cutting head. The head is typically threaded onto the shaft, so you’ll need to unscrew it by turning it counterclockwise.
- Grip the Head Firmly: Hold the cutting head with one hand while turning it counterclockwise. If the head is stuck, use pliers to get a better grip and add some extra torque.
- Turn Until Loose: Continue turning the head until it loosens completely and slides off the shaft. If it’s been on the trimmer for a long time, there may be some rust or dirt buildup, so be patient and persistent.
Step 7: Inspect the Shaft and Clean
With the head removed, take a moment to inspect the shaft and surrounding areas for any signs of wear, rust, or debris.
- Clean the Shaft: Wipe down the shaft with a rag to remove dirt, grass clippings, or old grease. This helps ensure that the new head, if you’re replacing the old one, will fit snugly and operate smoothly.
- Check for Damage: Look for any cracks or wear on the shaft threads. If you notice any significant damage, it might be time to replace the shaft or consult a professional.
Read What Oil to Use for a Craftsman Lawn Mower(Recommended by Manufacturer)
Step 8: Install the New Head (If Replacing)
If you’re installing a new cutting head, the process is essentially the reverse of removal. Make sure the new head is compatible with your Craftsman weed trimmer model.
Follow these steps:
- Thread the New Head: Line up the threads of the new cutting head with the shaft. Start turning the head clockwise to screw it onto the shaft.
- Tighten the Head: Once the head is threaded on, use your hand to tighten it. You don’t need to overtighten; just make sure it’s snug enough to stay in place during operation.
- Unlock the Shaft: If you locked the shaft earlier, don’t forget to remove the locking pin or screwdriver before proceeding.
Step 9: Reinsert the Spool of Line
After the new head is securely in place, you can now reinstall the spool of trimmer line.
- Place the Spool Inside the Head: Make sure the line is properly wound and untangled. Align the spool with the slots inside the head, and press it down firmly into place.
- Reattach the Bump Knob/Spool Cap: Screw the bump knob or spool cap back onto the head by turning it clockwise. Tighten it securely to ensure the spool stays in place during use.
Read Craftsman Lawn Mower Cord won’t Pull(3 Quick Ways To Fix)
Step 10: Test the Trimmer
Once everything is reassembled, it’s time to test the trimmer. Reconnect the power source (either plug in the trimmer, reinstall the battery, or refuel the gas tank).
- Power Up the Trimmer: Turn on the trimmer and test the operation of the cutting head. The line should feed properly when you bump the head on the ground, and the head should spin without wobbling or shaking.
- Check for Vibration: If you notice any unusual vibrations or noises, power off the trimmer and double-check that the head is securely fastened.
FAQ
How to Remove the Head Off a Craftsman Trimmer?
- Disconnect Power: Ensure the trimmer is powered off and unplugged or remove the battery if it’s cordless.
- Remove the Spool Cap: Unscrew or pry off the spool cap or bump knob by turning it counterclockwise. This reveals the spool of line inside.
- Remove the Spool: Lift the spool out of the head.
- Lock the Shaft: Insert a screwdriver into the hole near the base of the trimmer head to lock the shaft in place.
- Unscrew the Head: Turn the head counterclockwise to unscrew and remove it from the shaft.
How Do I Get the Head Off My Weed Eater?
- Turn Off the Weed Eater: Disconnect the power or remove the battery to ensure safety.
- Locate the Bump Knob: Identify the bump knob or spool cap at the center of the trimmer head.
- Twist the Cap: Turn the bump knob or cap counterclockwise to remove it.
- Lift Out the Spool: Remove the spool of line inside.
- Unscrew the Head: Once the spool is out, grip the head and turn it counterclockwise to unscrew it from the shaft.
How Do You Remove a Trimmer Head Blade?
To remove a blade from a trimmer head (used in heavy-duty Craftsman models or similar weed trimmers):
- Power Off: Unplug the electric trimmer or remove the battery, and for gas-powered models, turn off the engine and allow it to cool.
- Lock the Shaft: Find the small locking hole near the blade’s base. Insert a screwdriver or locking pin to prevent the shaft from spinning.
- Unscrew the Blade Nut: Use a wrench or socket set to unscrew the retaining nut securing the blade. This nut is often reverse-threaded, so turn it clockwise to loosen.
- Remove the Blade: Once the nut is off, the blade should slide off the shaft. Be careful, as the blades are sharp.
If the blade is damaged, dull, or rusted, consider replacing it with a new one.
How Do You Remove a Push and Load Trimmer Head?
The push-and-load mechanism simplifies the loading of trimmer lines, but when it comes to removing the head, the process is just as straightforward:
- Power Off the Trimmer: Always start by unplugging or removing the battery to ensure your safety.
- Locate the Release Tabs: Push-and-load trimmer heads typically feature two tabs or buttons that secure the cap in place.
- Press the Tabs: Press both release tabs simultaneously to lift off the top cap of the trimmer head.
- Remove the Internal Mechanism: After the cap is removed, you should be able to lift out the push-and-load mechanism, including the spool and any remaining trimmer line.
- Unscrew the Head: With the internal components removed, you can now unscrew the entire trimmer head by turning it counterclockwise.
If you’re replacing it, be sure to choose a compatible push-and-load head for your model.
How to Unlock a Trimmer Head?
Locking or unlocking the trimmer head usually refers to locking the shaft so you can remove or install the head. To unlock a trimmer head for removal:
- Locate the Locking Slot: Near the base of the head, there should be a small hole or slot designed for a locking pin or screwdriver.
- Insert a Tool: Insert a small screwdriver, pin, or even a nail into the slot to prevent the shaft from rotating.
- Unlock the Head: With the shaft locked, you can now easily unscrew the head by turning it counterclockwise.
- Remove the Locking Pin: Once the head is off, remove the locking pin or screwdriver before using the trimmer again.
Final Word
Removing the head from your Craftsman weed trimmer is a routine maintenance task that can help keep your equipment running efficiently. Following these steps will make the process straightforward and hassle-free.


