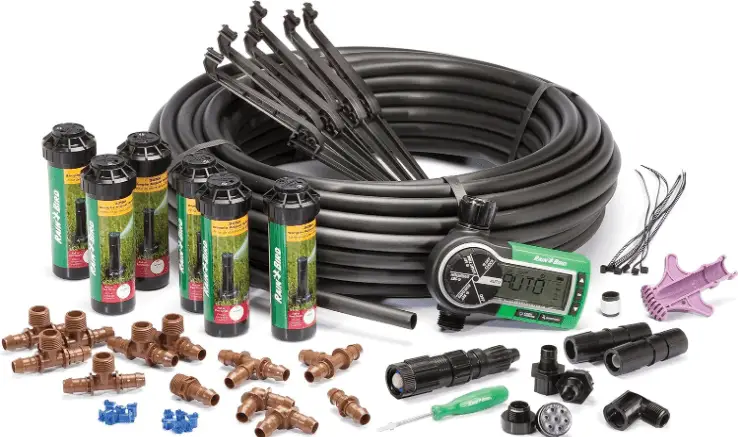
Maintaining a lush, green lawn requires a reliable sprinkler system, and Rain Bird is a trusted name in the irrigation industry. However, even the best systems can encounter issues.
This guide walks you through common Rain Bird sprinkler system problems, their causes, and step-by-step solutions to get your system back in top shape.
Troubleshooting Rain Bird Sprinkler System
Rain Bird sprinkler systems, like any irrigation setup, can face a range of issues due to wear and tear, improper installation, or environmental factors. Here are some of the most frequent problems:
- Sprinklers Not Turning On: This could stem from electrical issues, a faulty controller, or a problem with the water supply.
- Low Water Pressure or Uneven Watering: Clogged nozzles, damaged pipes, or incorrect valve settings often cause this.
- Leaking Sprinkler Heads or Valves: Worn-out seals, cracked components, or loose connections are typical culprits.
- Controller Malfunction: The system may not respond due to programming errors, power issues, or a defective controller.
- Sprinkler Heads Not Popping Up or Retracting: Debris, dirt, or broken parts can prevent proper movement.
Understanding these issues is the first step toward effective troubleshooting. Let’s dive into diagnosing and fixing them.
Step-by-Step Troubleshooting Process:
1. Sprinklers Not Turning On
If your Rain Bird sprinklers aren’t activating, start by checking the basics:
- Verify the Water Supply: Ensure the main water valve to the sprinkler system is fully open. A partially closed valve can prevent the system from functioning.
- Inspect the Controller: Check if the controller is powered on and programmed correctly. Confirm that the date, time, and watering schedule are accurate. If the display is blank, replace the backup battery or check the power source. For example, a 9-volt battery is commonly used in Rain Bird controllers, such as the ESP series.
- Test the Wiring: Loose or damaged wires between the controller and valves can disrupt signals. Use a multimeter to test for continuity in the wiring. If you find a break, replace the damaged section with waterproof connectors.
- Check the Solenoid: The solenoid on each valve controls water flow. If it’s faulty, the valve won’t open. Remove the solenoid and test it with a multimeter for resistance (typically 20–60 ohms for Rain Bird valves). Replace if defective.
2. Low Water Pressure or Uneven Watering
Uneven coverage or weak spray often points to water flow issues:
- Clean Nozzles and Filters: Debris like dirt or grass clippings can clog sprinkler heads. Remove the nozzle (most Rain Bird heads unscrew counterclockwise) and rinse it under water. Check the filter screen inside the head and clean it if necessary.
- Adjust Sprinkler Heads: Misaligned heads can cause dry spots. Use a Rain Bird adjustment tool or a screwdriver to tweak the spray pattern and radius. For example, Rain Bird 1800 series heads have an adjustment screw to control spray distance.
- Check for Pipe Leaks: Low pressure might indicate a leak in the underground piping. Look for soggy areas or pooling water in your yard. Dig carefully to locate and repair the leak using PVC pipe cutters and couplers.
- Inspect the Pressure Regulator: If your system has a pressure regulator, ensure it’s set to the recommended PSI (typically 30–50 PSI for Rain Bird systems). Adjust or replace it if it’s malfunctioning.
3. Leaking Sprinkler Heads or Valves
Leaks waste water and reduce system efficiency:
- Replace Worn Seals: For leaking sprinkler heads, check the riser seal or O-ring. If it’s cracked or worn, replace it with a compatible Rain Bird part. For example, the 1800 series uses a specific riser seal available at most hardware stores.
- Tighten Connections: Loose fittings at the valve or sprinkler head can cause leaks. Use a wrench to gently tighten connections, but avoid overtightening, which can crack plastic components.
- Inspect Valve Diaphragms: A leaking valve may have a damaged diaphragm. Disassemble the valve (e.g., Rain Bird DV or ASVF models), clean the diaphragm, and replace it if it’s torn. Kits are available from Rain Bird retailers.
4. Controller Malfunction
If the controller isn’t responding, try these steps:
- Reset the Controller: Power cycle the unit by unplugging it for a minute or removing the battery. For Rain Bird ESP-Me or ST8 models, press the reset button if available.
- Update Programming: Ensure the schedule aligns with your needs. Check for overlapping start times, which can confuse the system. Use the Rain Bird app for Wi-Fi-enabled controllers to simplify programming.
- Test the Transformer: A faulty transformer can prevent the controller from powering on. Use a multimeter to check for 24 volts AC output. Replace if necessary.
5. Sprinkler Heads Not Popping Up or Retracting
Stuck heads are often caused by debris or mechanical failure:
- Clear Debris: Remove the sprinkler head and flush it with water to clear dirt or sand. For Rain Bird pop-up heads, twist off the top and clean the internal riser.
- Check the Spring: A weak or broken spring can prevent retraction. Replace the head if the spring is damaged, as it’s often not sold separately.
- Adjust the Riser: If the head doesn’t pop up fully, ensure the riser isn’t obstructed by grass or soil. Trim around the head to provide clearance.
Related What Type of Oil for a Pressure Washer(+Top 3 Best Oil Picks)
Preventive Maintenance Tips
To avoid recurring issues, adopt these maintenance habits:
- Winterize the System: Before freezing temperatures, drain the system to prevent pipe bursts. Rain Bird recommends using compressed air to blow out residual water.
- Regular Inspections: Check sprinkler heads, valves, and the controller at the start of each season. Clean nozzles and replace worn parts proactively.
- Monitor Water Pressure: Install a pressure gauge to ensure your system operates within the optimal range (30–50 PSI for most Rain Bird setups).
- Update Controller Firmware: For Wi-Fi-enabled models, check for firmware updates via the Rain Bird app to improve performance.
Related Toro Flex 800 Nozzle Chart(For All Nozzle Size)
When to Call a Professional
While many issues can be resolved with DIY troubleshooting, some situations require expert help:
- Extensive pipe damage or leaks that are hard to locate.
- Electrical issues beyond basic wiring checks.
- Persistent controller failures despite resets and battery replacements.
Contact a Rain Bird-certified technician or a local irrigation specialist for complex repairs. You can find professionals through Rain Bird’s website or local landscaping services.
Final words
Troubleshooting a Rain Bird sprinkler system doesn’t have to be daunting. By systematically checking the water supply, sprinkler heads, valves, and controller, you can diagnose and fix most issues yourself.
Regular maintenance and timely repairs will keep your system running efficiently, ensuring your lawn stays vibrant and healthy. If you encounter persistent problems, don’t hesitate to seek professional assistance to protect your investment.