
Charging system issues can be frustrating, especially when they leave you stranded on the mowing field with a dead battery.
If you own a Kawasaki mower and are experiencing charging system problems,
This comprehensive guide will walk you through troubleshooting steps to help you get back on the road.
From understanding the components of the charging system to practical tips for preventing future issues, we’ve got you covered.
Let’s jump in.
Kawasaki Charging System Troubleshooting
What is the charging system?
The charging system in your Kawasaki mower is responsible for generating electricity and maintaining the charge in your battery.
It consists of three main components: the battery, the alternator (also known as the stator), and the voltage regulator or rectifier.
Importance of a properly functioning charging system
A well-functioning charging system is crucial for several reasons.
Firstly, it ensures that your battery remains charged, allowing your motorcycle to start reliably.
Secondly, it supplies power to various electrical components such as lights, the ignition system, and accessories.
Lastly, it prevents excessive strain on the battery, prolonging its lifespan.
Read Will a Lawn Mower run with a Dead Battery(What To do)
Components of the Kawasaki charging system
The charging system on your Kawasaki mower consists of the following components:
- Battery: The battery stores electrical energy and provides power during startup and when the electrical demand exceeds the alternator’s output.
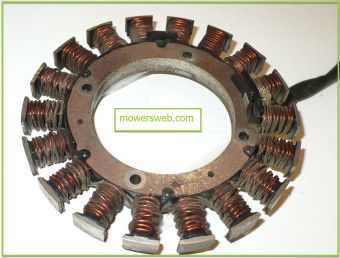
- Alternator (Stator): The alternator, or stator, is responsible for generating electricity. It is comprised of coils and magnets that produce alternating current (AC).
- Voltage Regulator/Rectifier: The voltage regulator/rectifier transforms the alternating current (AC) that the alternator produces into direct current (DC). It also regulates the voltage to prevent overcharging the battery.
Kawasaki Charging System Problems
When your Kawasaki charging system encounters problems, you may experience various issues.
Here are some of the most common signs of charging system trouble:
1. Battery not charging
If your battery fails to charge even after riding your motorcycle, it could indicate a problem with the charging system.
This issue often leads to a drained battery and difficulty starting the bike.
2. Dim or flickering lights
Dim or flickering lights are a clear indication of charging system problems. If you notice a decrease in headlight brightness or flickering instrument panel lights, it’s time to investigate the charging system.
3. Difficulty starting the motorcycle
Starting your Kawasaki mower can be challenging if the battery is weak or dead as a result of charging system issues.
If you find yourself needing jump-starts frequently, it’s crucial to inspect the charging system.
Read How to Charge Toro Electric Start Mower(In 5 Steps)
Troubleshooting the Kawasaki Charging System
When faced with charging system problems, a systematic approach to troubleshooting can help identify the root cause.
Follow these steps to diagnose and resolve issues with your Kawasaki charging system:
Step 1: Checking the battery
Start by inspecting the battery. Ensure it is properly connected, with clean and tight terminals.
Test the battery voltage using a multimeter and compare it to the manufacturer’s specifications.
If the voltage is low, charge the battery and retest. If it still doesn’t hold a charge, consider replacing the battery.
Step 2: Inspecting the alternator
Next, inspect the alternator. Check the wiring connections for any signs of damage or corrosion.
Use a multimeter to measure the output voltage of the alternator. If the readings are significantly lower than the manufacturer’s specifications, the alternator may be faulty and require replacement.
Step 3: Testing the voltage regulator
The voltage regulator plays a vital role in regulating the charging system’s voltage output.
Test the voltage regulator using a multimeter according to the manufacturer’s instructions.
If the readings are outside the specified range, it may be necessary to replace the voltage regulator.
Read Kubota BX2200 Problems(6 Common ProblemS with Solutions)
Kawasaki Elektrode Troubleshooting
Troubleshooting electrode issues on a Kawasaki engine typically refers to problems related to spark plugs or ignition system components.
If you’re experiencing issues with your Kawasaki engine’s electrodes, such as misfiring, poor starting, or a lack of power,
Here’s a step-by-step guide to help you identify and address the problem:
1. Safety Precautions: Before working on any engine, ensure it is turned off and the ignition key is removed. Allow the engine to cool down if it has been running recently.
2. Visual Inspection: Start by visually inspecting the spark plug and ignition components.
- Check the spark plug for fouling, damage, or excessive carbon buildup. Replace the spark plug if it’s worn or fouled.
- Inspect the spark plug wire or ignition coil for any visible damage, such as cracks or frayed wires. Replace damaged components.
3. Check the spark plug gap. Ensure the spark plug gap is set to the manufacturer’s specifications. Use a spark plug gap tool to adjust it if necessary. The correct gap size should be mentioned in your engine’s manual.
4. Clean the Spark Plug: If the spark plug is dirty or fouled, use a wire brush or spark plug cleaner to remove deposits. Make sure it’s completely clean before reinstalling it.
5. Test for Spark: To check if the ignition system is working correctly, perform a spark test.
- Remove the spark plug wire or coil wire from the spark plug.
- Insert the spark plug into the wire or coil and ground the threaded part of the spark plug against the engine block.
- Crank the engine (pull the starter cord or use the electric starter) while observing the spark plug gap. You should see a strong blue spark. If there’s no spark or it’s weak, there may be an issue with the ignition coil, spark plug wire, or other ignition components.
6. Inspect Ignition Components: If you didn’t see a spark or it was weak during the spark test, check and potentially replace the following components:
- Ignition coil: Ensure it’s properly connected and not damaged. Test it using an ohmmeter or a dedicated ignition coil tester.
- Spark plug wire: Inspect for damage and test its resistance using a multimeter to ensure it falls within the specified range.
- Ignition module (if applicable): Check for proper connections and test if necessary.
7. Check Fuel and Air: Sometimes, poor electrode performance can also result from issues with fuel and air supply. Make sure your engine is getting an adequate supply of fuel and air. Check the air filter and fuel lines for blockages or damage.
8. Fuel Quality: Ensure you are using clean, fresh fuel with the correct octane rating for your engine. Stale or contaminated fuel can affect electrode performance.
Tips for Preventing Charging System Problems
Taking proactive measures to prevent charging system issues can save you time, money, and frustration.
Here are some tips to keep your Kawasaki charging system in excellent condition:
- Regular maintenance: Follow the manufacturer’s recommended maintenance schedule, including regular inspections and servicing of the charging system components.
- Avoiding overloading the electrical system: Be mindful of the electrical load you place on your motorcycle. Excessive use of additional accessories or modifications can strain the charging system.
- Proper battery care: Maintain your battery by keeping it clean and secure. Regularly check the battery’s fluid levels and ensure it is securely mounted.
How to check Charging System on Kawasaki Mule
To check the charging system on a Kawasaki Mule, you can follow these steps:
1. Start the Engine
Begin by starting the Kawasaki Mule’s engine and letting it idle for a few minutes to warm up.
2. Turn on Electrical Accessories
Turn on any electrical accessories you have installed on the Kawasaki Mule, such as lights, a radio, or other electrical components.
This will create a load on the charging system, allowing you to test its functionality under normal operating conditions.
3. Measure Battery Voltage
Use a multimeter to measure the voltage across the battery terminals. Connect the multimeter’s positive lead to the positive terminal of the battery and the negative lead to the negative terminal.
The battery voltage should read around 12.6 to 12.8 volts for a fully charged battery. If the voltage is significantly lower, it may indicate a battery issue.
4. Monitor Voltage while Revving
While the engine is still running, gradually increase the engine RPM by revving it up.
Observe the multimeter to monitor the voltage reading across the battery terminals.
As you increase the RPM, the voltage should also increase. Ideally, the voltage should reach around 13.5 to 14.5 volts, indicating that the charging system is working correctly.
If the voltage remains low or doesn’t increase, there may be an issue with the charging system.
5. Check for Consistent Voltage
Keep an eye on the multimeter as you maintain a steady RPM. The voltage reading should remain relatively stable within the acceptable range.
Any significant fluctuations or readings outside the recommended range may indicate a problem with the alternator or voltage regulator.
How to test voltage regulator on Kawasaki engine
Testing a voltage regulator on a Kawasaki engine is essential to ensuring that it is functioning correctly and providing a stable voltage output to your electrical system.
Here are the steps to test a voltage regulator:
Safety Precautions: Before you begin, make sure to disconnect the battery to prevent any electrical accidents.
Tools and materials needed:
- Multimeter
- Screwdriver
- Safety goggles
- Gloves
Testing Procedure:
- Locate the Voltage Regulator: The voltage regulator is typically located on or near the engine’s electrical system. It is a small device with wires connected to it.
- Check the wiring: Inspect the wiring connected to the voltage regulator. Look for any visible damage or loose connections. Tighten any loose connections, and repair or replace damaged wiring.
- Set Up the Multimeter: Turn on your multimeter and set it to the DC voltage mode. Choose a voltage range that includes the expected output voltage of your voltage regulator (usually 12–14 volts for most small engines).
- Connect the Multimeter: a. Connect the black (negative) probe of your multimeter to the negative (-) terminal of the battery or a known good ground on the engine. b. Connect the red (positive) probe of your multimeter to the output terminal of the voltage regulator. This is where the regulator sends power to the battery and electrical system.
- Start the Engine: Start the Kawasaki engine and let it run at a consistent speed. This is important because the voltage regulator’s output can vary depending on the engine’s RPM.
- Read the voltage: Look at the multimeter reading. It should fall within the expected voltage range (e.g., 12–14 volts). If the voltage is significantly lower or higher than the expected range, it indicates a problem with the voltage regulator.
- Rev the Engine (Optional): While observing the multimeter, you can rev the engine to different RPM levels. The voltage output should remain relatively stable as the engine speed changes. If it fluctuates excessively, the voltage regulator may be faulty.
- Replace or Repair (If Necessary): If the voltage regulator’s output is consistently outside the expected range or exhibits unstable voltage, it’s likely defective and should be replaced. If it’s within the range and stable, it’s functioning correctly.
- Reconnect the Battery: After testing, reconnect the battery and secure all connections.
- Final Check: To be thorough, you can retest the voltage regulator after reconnecting the battery to ensure that it still operates correctly under load.
Read Kohler Engine Not Charging Battery(3 Quick Ways To Fix)
What five steps should you follow while inspecting Kawasaki charging system?
Visual Inspection
Begin by visually inspecting the charging system components, including the battery, alternator, and voltage regulator.
Look for any signs of physical damage, loose connections, or corrosion.
Check Battery Connections
Ensure that the battery connections are secure and free from corrosion. Clean the terminals if necessary.
Loose or corroded connections can disrupt the flow of electricity.
Measure Battery Voltage
Use a multimeter to measure the voltage of the battery. Connect the multimeter leads to the positive and negative terminals of the battery.
The voltage should be within the manufacturer’s specified range. A low voltage reading may indicate a weak or discharged battery.
Inspect Alternator Output
Start the motorcycle and let it run at idle. Use the multimeter to measure the output voltage of the alternator.
Connect the multimeter leads to the alternator’s output terminals. The voltage should increase when the engine RPM rises.
Compare the readings to the manufacturer’s specifications. If the voltage is significantly lower than expected, it may indicate a faulty alternator.
Test Voltage Regulator
With the engine still running, test the voltage regulator using the multimeter. Connect the multimeter leads to the battery terminals.
The voltage reading should remain steady within the specified range, even as the engine RPM varies.
If the voltage fluctuates or exceeds the recommended range, it may indicate a faulty voltage regulator.
Read How to Charge Toro Electric Start Mower(In 5 Steps)
Kawasaki engine not charging
| Step | Action | Details and Notes |
|---|---|---|
| 1 | Safety Precautions | Turn off the engine and disconnect the battery. |
| 2 | Visual Inspection | Check for damage, corrosion, loose connections, etc. |
| 3 | Check Battery Voltage | Measure battery voltage (12.6-12.8V for full charge). |
| 4 | Inspect Alternator/Charging Coil | Check wires, measure AC voltage output at the coil. |
| 5 | Voltage Regulator Test | Check voltage output with a multimeter. |
| 6 | Replace Faulty Components | Replace defective alternator, voltage regulator, etc. |
| 7 | Reconnect the Battery | Ensure all connections are secure. |
| 8 | Final Check | Recheck battery voltage while the engine is running. |
| 9 | Monitor Performance | Keep an eye on the electrical system over time. |
Final Remarks
A well-functioning charging system is vital for the reliable operation of your Kawasaki motorcycle.
By getting to know the components and troubleshooting steps outlined in this guide, you can diagnose and resolve common charging system issues.
Remember to perform regular maintenance and follow best practices to prevent future problems. Stay powered up and enjoy your rides with confidence!
FAQs
How often should I inspect my Kawasaki charging system?
It is recommended to inspect your charging system at least once a year or whenever you notice any signs of charging issues.
Can I use a different brand of battery for my Kawasaki motorcycle?
While it is generally recommended to use a battery from the same brand, you can also use a compatible battery from a reputable manufacturer.
Ensure the specifications match your motorcycle’s requirements.
Is it normal for the alternator to get warm during operation?
Yes, some heat generation is normal due to the electrical currents flowing through the alternator.
However, excessive heat may indicate a problem and should be further investigated.
What is the average lifespan of a Kawasaki motorcycle battery?
The lifespan of a battery can vary depending on usage and maintenance. On average, a motorcycle battery can last between two and five years.
Can I replace the voltage regulator myself?
If you have the necessary knowledge and experience, you can replace the voltage regulator yourself.
However, if you are unsure, it is recommended to seek professional assistance to avoid any potential damage.
Read Kohler Engine Dies After 30 Minutes(7 Quick Ways To Fix)