

Replacing a drive belt on a John Deere Z445 zero-turn lawn mower can seem like a daunting task, but it’s actually quite simple with the right instructions and tools.
In this post, we will walk you through the process step-by-step, and provide a diagram to help make it as easy as possible.
Before we begin, it’s important to note that the John Deere Z445 has two different belts that power the mower’s blades and drive system.
The first belt, known as the PTO (Power Take-Off) belt, powers the blades and is located under the mower deck.
The second belt, known as the drive belt, powers the drive system and is located on the right side of the mower.
Let’s jump in.
How to Replace Belt on John Deere Z445 Drive Belt Diagram
Step 1: Park the mower on a level surface
Park the mower on a level surface and engage the parking brake. Make sure the mower is turned off and the key is removed.
Step 2: Remove the mower deck from the tractor
Depending on your model, you may need to remove a few bolts or pins to do this. Consult your mower’s owner’s manual for specific instructions.
Step 3: Locate the drive belt
The drive belt is located on the right side of the mower and runs from the engine pulley to the transmission pulley. The belt should be visibly worn or damaged if it needs to be replaced.
Step 4: Release the tension on the drive belt
This is typically done by releasing a spring-loaded idler pulley or using a belt tensioning tool.
Make sure to consult your owner’s manual for specific instructions on how to do this on your particular model.
Step 5: Remove the old drive belt
Once the tension has been released, carefully remove the old belt from the engine and transmission pulleys.
Step 6: Install the new drive belt
Place the new belt on the transmission pulley first, then thread it around the idler pulleys, and finally onto the engine pulley.
Ensure the belt is properly seated in all the pulleys, and that it’s not twisted.
Step 7: Re-tension the drive belt
Once the new belt is installed, re-tension it by adjusting the idler pulley or using the belt tensioning tool, following the same process you used to release the tension.
Step 8: Reinstall the mower deck onto the tractor.
Step 9: Test the mower’s drive system
Start the mower and put it in gear to make sure the belt is properly tensioned and the drive system is working correctly.
That’s it! You’ve successfully replaced the drive belt on your John Deere Z445 zero-turn lawn mower.
Remember to always consult your owner’s manual for specific instructions and safety guidelines, and to check your mower’s belts for wear and damage regularly to ensure optimal performance and prevent costly repairs.
Read How to Replace Mower Belt on John Deere D130 Diagram
How To Change a PTO Belt?
To change a PTO (power take-off) belt on a tractor or other agricultural equipment, you will need to follow the below steps:
1. Park the tractor on a flat surface and set the parking brake. Turn off the engine and disconnect the battery to prevent accidental starting.
2. Locate the PTO belt cover, which is typically located on the side of the tractor transmission.
It may be held in place with bolts, clips, or a combination of both. Use the appropriate tool to remove the cover.
3. Once the cover is removed, you will be able to see the PTO belt. The belt may be tight, so use a belt tensioner tool to release the tension on the belt.
4. Carefully remove the old belt from the pulleys. Make sure to pay attention to the routing of the belt to make sure you put the new belt on the same way.
5. Install the new belt by routing it around the pulleys and tensioner in the same way as the old belt.
Use the belt tensioner tool to make sure the belt is tight enough.
6. Reinstall the belt cover and bolts, or clips, and make sure it’s securely in place.
7. Reconnect the battery and turn on the engine. Check the tension of the belt again and adjust as necessary.
Make sure the belt is running true and not rubbing against any other parts before you start using the tractor again.
Read Are Craftsman Mower Decks Interchangeable(Explained)
What is the John Deere Z445 Drive Belt Size?
The drive belt size for a John Deere Z445 zero-turn mower is typically a 137.5-inch belt.
This belt is used to power the mower deck and to transfer power from the engine to the pulleys that drive the mower blades.
It is important to use the exact belt size specified for your mower model, as using the wrong size belt can cause damage to the mower and result in reduced performance.
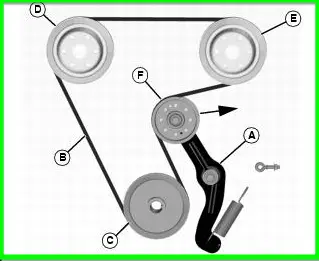
John Deere Belt Diagram
The belt diagram will show how the belts are routed around the various pulleys in the mower’s deck and transmission system.
It’s crucial to follow the diagram carefully when replacing or adjusting belts to ensure proper operation and prevent premature wear.
- Mower Deck Belt: This belt connects the engine pulley to the mower deck pulleys, driving the blades for cutting grass. It is usually the longest belt and loops around various pulleys to engage the cutting blades. The belt routing may differ depending on the mower deck size and configuration.
- Drive Belt: The drive belt connects the engine pulley to the transmission pulley, enabling the mower to move forward or backward. On some models, there might be separate belts for forward and reverse. The drive belt is responsible for transferring power from the engine to the transmission.
- Transmission Belt: This belt connects various components in the transmission system, allowing the wheels to turn at different speeds, controlling the mower’s direction and speed.
- PTO Belt: If your mower has a Power Take-Off (PTO) feature for running additional attachments like a snowblower or tiller, there will be a PTO belt. It connects the engine pulley to the PTO pulley, engaging and driving the PTO attachments.
Read 11 Reasons Why John Deere D110 Won’t Start(Fixed)
John Deere Z445 Belt Diagram

- Mower Deck Belt: The mower deck belt is the longest belt and is responsible for driving the cutting blades. It goes around the pulleys on the mower deck to engage the blades for cutting grass.
- Drive Belt: The drive belt connects the engine pulley to the transmission pulleys. It is responsible for transferring power from the engine to the wheels, enabling the mower to move forward or backward.
Read John Deere Fuel Filter Not Full(3 Quick Ways To Fix)
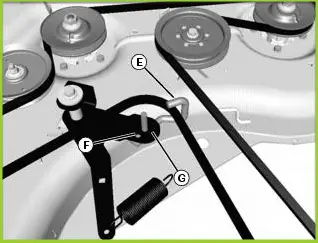
John Deere z445 drive Belt Tension Spring Location
The drive belt tension spring on a John Deere Z445 zero-turn mower is located near the transmission pulleys and the belt tensioner arm.
The tension spring plays a crucial role in maintaining the proper tension on the drive belt, ensuring it functions correctly and transfers power efficiently from the engine to the wheels.
To locate the drive belt tension spring on your specific Z445 model, follow these steps:
- Safety First: Before working on your mower, make sure the engine is off, the key is removed, and the spark plug wire is disconnected to prevent accidental starts.
- Lift the Mower: Carefully raise the front of the mower using an appropriate lifting mechanism, such as a mower lift or blocks, to allow access to the underside of the mower.
- Locate the Transmission Pulleys: The drive belt tension spring is typically positioned near the transmission pulleys, which are located on the underside of the mower deck. These pulleys are connected to the drive belt and are responsible for transferring power to the wheels.
- Find the Belt Tensioner Arm: The belt tensioner arm is a metal arm that pivots to apply tension to the drive belt. It will have a pulley on one end that the drive belt runs around.
- Identify the Tension Spring: The tension spring is connected to the belt tensioner arm on one end and the mower frame on the other. It provides the tension necessary to keep the drive belt properly engaged.
- Inspect and Adjust: Once you’ve located the tension spring, check its condition to ensure it is not damaged or broken. If the drive belt is slipping or not functioning correctly, you may need to adjust the tension by repositioning or replacing the tension spring.
Read Where does the Spring go on a Mower Deck(Explained)
Final Remarks
Replacing the drive belt on a John Deere Z445 zero-turn mower is a fairly straightforward process that can be done with some basic tools and a little mechanical knowledge.
The key steps involve locating the belt cover, releasing the tension on the old belt, carefully removing it, and routing the new belt around the pulleys in the same way.
It is important to always use the belt size specified for your mower model to avoid damage and reduced performance.
Safety precautions such as wearing gloves, safety glasses, and appropriate clothing should be taken, and
Refer to the owner’s manual or service manual for the specific model of your mower for precise instructions and warnings about the drive belt replacement.
Read 10 Common John Deere S240 Problems(With Solution)
FAQ
Why do I need to replace the drive belt on my John Deere Z445?
The drive belt on your John Deere Z445 is a critical component that transfers power from the engine to the mower deck or other attachments.
Over time, the belt can wear out, stretch, or break, leading to decreased performance and potential damage to the mower.
Replacing the drive belt ensures smooth operation and optimal performance.
What tools do I need to replace the drive belt?
To replace the drive belt on your John Deere Z445, you will need the following tools:
- Socket set or wrench
- Pliers
- Screwdriver (flathead or Phillips, depending on the model)
- Belt tension gauge (recommended but not essential)
- Safety gloves and eye protection
Where can I find the drive belt diagram for my John Deere Z445?
The drive belt diagram for your John Deere Z445 can typically be found in the operator’s manual that came with your mower.
If you don’t have the manual, you can visit the John Deere website and enter your model number to access the online manuals and diagrams.
Read Husqvarna Z254F Drive Belt Tension Spring(Explained)
John Deere z445 Drive Belt Replacement
Here’s a step-by-step guide to replacing the drive belt on your John Deere Z445:
- Park your mower on a flat, level surface and engage the parking brake.
- Locate the belt routing diagram on the mower deck or in the operator’s manual.
- Use the belt tension gauge (if available) to measure the tension of the existing belt for reference.
- Using the appropriate socket or wrench, loosen the tension on the belt by adjusting the idler pulley or belt tensioner.
- Carefully remove the old belt from the pulleys, making note of the routing and how it interacts with the various components.
- Compare the old belt with the new replacement belt to ensure they have the same dimensions and markings.
- Begin installing the new belt by routing it around the pulleys according to the diagram, following the same path as the old belt.
- Use pliers or a screwdriver to assist in slipping the belt over the pulleys, ensuring it is properly seated in each groove.
- Adjust the tension on the new belt by adjusting the idler pulley or belt tensioner until the belt has the same tension as the old belt measured with the tension gauge.
- Double-check the belt routing to ensure it matches the diagram and is correctly installed on all pulleys.
- Test the mower by engaging and disengaging the blades or attachments to confirm the new belt is functioning properly.
- Dispose of the old belt responsibly, or keep it as a spare if it is still in good condition.
Are there any additional tips or precautions I should be aware of?
Yes, here are a few additional tips and precautions to keep in mind:
- Always refer to the operator’s manual and belt routing diagram specific to your John Deere Z445 model for accurate instructions.
- Make sure the engine is turned off and cooled before starting any maintenance or repair work.
- Wear safety gloves and eye protection to protect yourself from potential injury.
- Take pictures or make notes of the belt routing before removing the old belt to help with the installation of the new one.
- Inspect the pulleys and other components while replacing the belt to ensure they are in good condition. Replace any damaged or worn parts as needed.
Read John Deere Z915E: 4 Common Problems and How to Fix Them